How to Create 3D Animated Stories? Create Yours with AI and These Tips!
Discover how to create consistent characters for 3D animations using free tools and practical techniques. Turn your ideas into amazing stories!
You've dreamed of create your own animated stories in 3D? Whether it's a superhero adventure, a biblical narrative or even a Pixar-style children's tale, all of this is within your reach with the right tools.
Create characters consistent, which can be used in different scenarios and situations, is a common challenge, but with a little planning and the appropriate tools, this process becomes much simpler.
In this guide, we will explore step by step how to structure your characters, choose the ideal tools, create rich scenarios and turn all of this into full animations. Whether you're a beginner or someone with basic experience in digital creations, here you'll find practical tips to get started right now.
1. Structure Your Character
The first step to create a 3D animation is to structure your character. This includes defining all of his visual and behavioral aspects, ensuring that he is consistent in every scene in his story. There are two main ways to address this:
- If you already have a created character: Use tools like ChatGPT to organize its features. Detail information like:
- Name and gender.
- Physical appearance (eye color, hair style, height, among others).
- Clothes and style.
- Common actions, emotions and poses.
- If it will create from scratch: If you haven't set anything yet, start manually structuring your character. Think about the elements that best connect with the story you want to tell. For example, you can imagine:
- A 40-year-old warrior with a stone body.
- A 20-year-old wearing a red hood, with an air of confidence.
Regardless of the approach, maintaining a clear structure is essential. You can save this information in a text document, ensuring that character characteristics remain consistent throughout the project.
💡 Tip: Save character information in a notepad or text document to facilitate future references and edits.
2. Choosing the Ideal Tool
One of the biggest challenges in creating animated stories is to maintain character consistency throughout different scenarios. To solve this, the choice of the right tool makes all the difference. One of the best options currently is Kling AI.
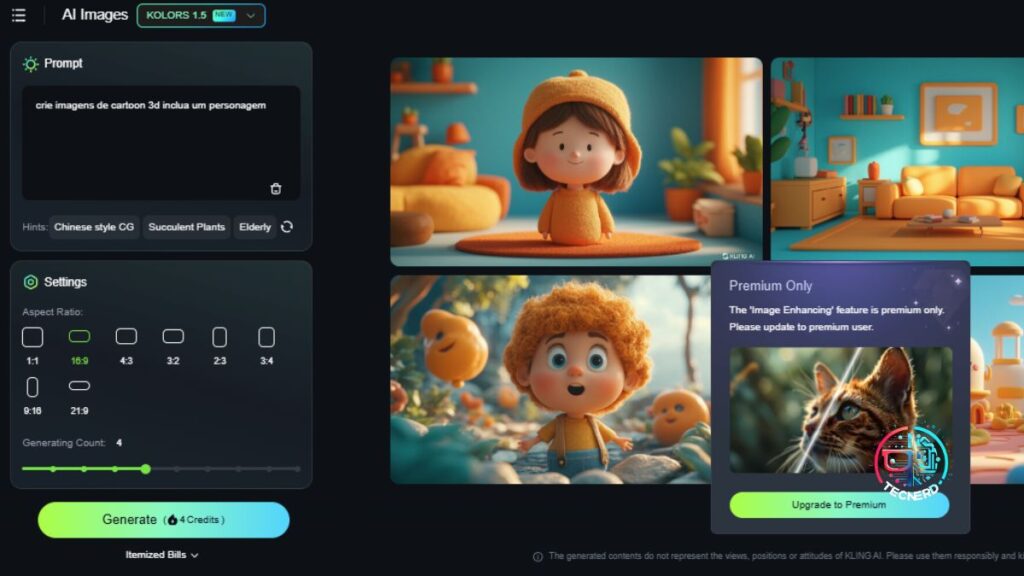
Why choose Kling AI?
- Free credits: Kaing offers 360 free renewable credits, allowing you to create multiple images at no cost.
- Consistency: Even in the free version, the tool can maintain the character's visual identity even when changing scenarios or emotions.
- Ease of use: With an intuitive interface, you can adjust details such as format (vertical, horizontal) and quantity images generated by prompt.
Ideal configuration for animated creations
- Use model 1.5 for Pixar style creations. The 1.0 model tends to be more realistic, which is not ideal for animations 3D.
- Adjust the format to 16:9 (horizontal screen), ensuring a better suitability to the scenes.
- Create up to four images at a time to optimize credit usage and ensure profitable variations.
3. Creating Scenarios and Variations
Now that you've already structured your character and chose the ideal tool, it's time to create the scenarios and variations. This includes defining where and how the character will interact throughout the story. Here are some tips for making the process easier:
- Plan the main scenes: List the most important moments in the story you want to tell. For example:
- "Na floresta misteriosa."
- "Encontrando um pássaro mágico."
- "Na clareira com o lago cristalino."
- Adapt the prompt: For each scene, change only three main elements:
- Emotion: How the character is feeling.
- Action: What he's doing.
- Scenario: The surrounding environment.
- Repeat the process: Create variations for each main scene, ensuring that all images are connected to the plot.
💡 Tip: If you need inspiration, use ChatGPT to generate detailed scene descriptions or even create a complete story.
4. Transforming Images in Animations
With the images created, you can turn them into simple animations to tell your story. Kaing AI itself offers a feature called AI Video, which allows you to add movements to the generated images.
How to use Kling's AI Video
- Import your images: Upload the previously created images.
- Add movement: Escolha um movimento de câmera simples, como "zoom in" ou "panorâmico".
- Export the video: Download the result to use in your final project.
This feature is ideal for creating short animations with narrations or background soundtracks.
Five. Narration and Sound Effects
A good animated story needs an engaging narration. For that, the Cap Online is an excellent option. It allows you to convert texts up to 5,000 characters in audio for free.
How to use CapCut for narrations
- Access the site: Use the online version to access all features for free.
- Choose the language: Filtre para "português" e selecione a opção desejada para facilitar a navegação e garantir uma experiência mais fluida.
- Import the video: Clique na opção de "Importar mídia" e selecione o vídeo ou áudio que deseja usar. O CapCut suporta diversos formatos.
- Add the narration: Após importar o vídeo, acesse a ferramenta de "Áudio" e escolha a opção de "Gravar narração". Você pode gravar diretamente pelo aplicativo ou importar uma gravação prévia.
- Adjust the audio: Use editing tools to sync the narration with the video. CapCut offers options to cut, increase or decrease the volume, and even adjust the narration speed.
- Finish and export: After adjusting all the details, preview the final video and, if satisfied, export the file to the desired format.
- Extra tips:
- Sound effects: In addition to the narration, you can add sound effects to give more life to the video.
- Text on the screen: Use the text tool to highlight important parts of the narration.
With these steps, you will be ready to create videos with professional narration using CapCut!

Related Articles